Loading Images
In 2D mode, you prepare the image that the 3D model will use. Color changes affect the target colors; pixel edits affect the shapes and details in the print.
Choose A Source
Click Choose file in the preview toolbar, or drag an image file into the 2D preview. Only the first file in a drop is loaded. Use an image format your browser or desktop webview can decode; PNG is useful when transparency matters. Develop camera RAW files and export an ordinary image format first.
Kromacut starts with its logo as an example. Loading another image replaces the current working image. It does not publish the image or download a source from a pasted web link.
Inspect Without Changing The Image
| Control | Effect |
|---|---|
| Mouse wheel | Zooms around the pointer. This changes only the view, not image resolution or print size. |
| Left-drag | Pans when no touch-up tool is active. |
| Middle-drag | Pans even while a touch-up tool is active. |
| Toggle checkerboard | Shows a pattern behind transparent pixels. The pattern is not part of the image or print. |
| Image size badge | Shows pixel dimensions. During cropping, it also shows proposed crop dimensions. |
The preview uses sharp pixel edges rather than smoothing them. Zoom in to find isolated pixels and narrow details.
Crop, Resize, Or Change Print Size?
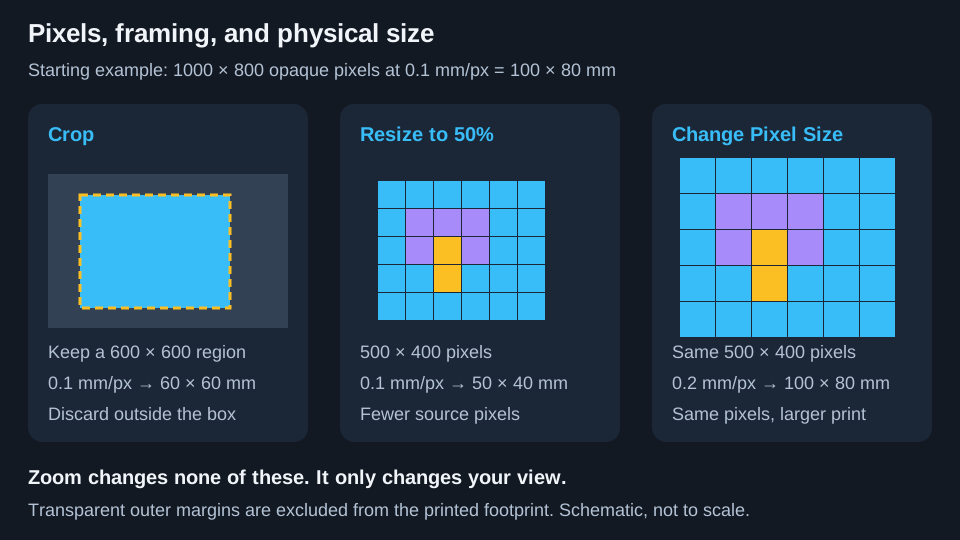
Schematic dimensions illustrate the relationship, not a recommended print size.
Crop
Click Crop, drag the selection or its corner and edge handles, then choose Save crop. Cancel crop leaves the image unchanged. Saving keeps the selected rectangle at image-pixel resolution.
Crop out unwanted margins before reducing colors so they do not compete with the subject for the palette. Crop is rectangular; use transparency for an irregular background.
Resize Image
Scale runs from 1% to 100%, default 50%. Current and After resize show dimensions before you commit. Click Apply to downscale. 100%, or a value that rounds to the same dimensions, does nothing. The reset arrow resets the percentage, not the image.
Resize uses smoothing, so it can introduce blended edge colors and partial transparency. Resize before quantization, or reduce colors again afterward. Repeated applications resize the already-resized image: two 50% applications leave 25% of the original width and height. Use Undo to restore detail rather than trying to enlarge it here.
Physical size in 3D
Pixel Size (XY) is millimeters per image pixel, not image resolution. A fully opaque 1000-pixel-wide image at 0.1 mm/pixel is 100 mm wide. Resizing to 500 pixels at the same setting gives 50 mm. Changing to 0.2 mm/pixel restores the 100 mm width, but not the discarded detail. Fully transparent outer margins are excluded from the model footprint.
Reducing pixel dimensions reduces processing and geometry workload. Changing Pixel Size alone does not remove pixels. See 3D mode for physical-scale controls.
Touch Up Pixels
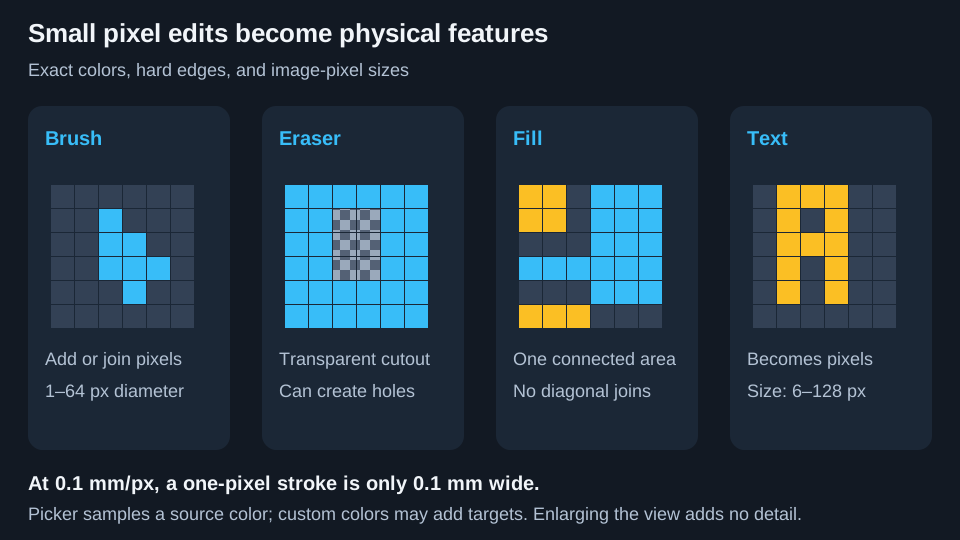
Brush, Eraser, Fill, Text, and Pick color from image use hard-edged pixels without antialiasing. A custom color can still add a palette color; hard edges prevent unintended blended edge colors.
| Tool or field | How it works | Effect on the print |
|---|---|---|
| Brush | Drag to paint opaque pixels. Size is a diameter from 1 to 64 image pixels, default 4. | Repairs outlines, joins regions, or thickens details. The cursor shows its footprint. |
| Eraser | Uses the same size control but writes fully transparent pixels. | Removes material from the shape, potentially creating holes or disconnecting pieces. |
| Fill | Replaces the clicked region matching its exact RGB and alpha. Connections are edge-to-edge, not diagonal. | Recolors one connected region, not every occurrence of the color. There is no photographic color-tolerance setting. |
| Pick color from image | Samples a nontransparent source pixel and switches to Brush. | Reuses a color from the underlying image, not an unbaked adjustment effect. |
| Tool color | Choose from Image colors, use the picker, or enter six-digit hex. Closing the popover commits the selection. | Sets the opaque Brush, Fill, or Text color. |
| Text size | Font size from 6 to 128 image pixels, default 24. | Larger text leaves larger features at a fixed physical scale; this is not a millimeter value. |
Place text
Select Text, click the image, and type. Enter adds a line. Drag the move handle above the box to reposition it, or its right-edge handle to adjust word wrapping. Size and color update the draft.
Click the check button or press Ctrl+Enter (Command+Enter on macOS) to apply. Clicking another image location or switching tools also commits it. X or Escape discards an open draft; another Escape exits the tool. Applied text becomes pixels, not an editable text object.
Each changed stroke, fill, or text placement is one image-history step. A 1-pixel stroke at 0.1 mm/pixel is only 0.1 mm wide, however large it looks when zoomed in. Inspect narrow lettering in the slicer.
Remove A Background
There is no automatic subject-selection or AI background-removal control. For a flat background, open its swatch in Image colors, make it fully transparent, and Apply. This removes every exact match, including matching subject pixels. Use Eraser for local removal and checkerboard to inspect the outline.
Do not use swatch Delete for this: it remaps colors instead of making pixels transparent. See Image colors.
Undo, Download, And Clear
Undo and Redo step through committed image changes such as loading, cropping, resizing, baking adjustments, quantization, dedithering, swatch edits, and touch-ups. They are not a history of every setting or slider movement. A new image edit clears the redo path. History belongs to the current app session, so save the image if you need it later.
Download image saves the underlying working image as PNG at image-pixel resolution. It excludes zoom, checkerboard, crop handles, and text drafts. Apply text and Apply adjustments first to include them. Desktop uses a file-save dialog; browser placement follows browser download settings.
Remove image clears the workspace, not the settings. Do not rely on it as a reversible edit: it does not add the cleared image as a new Undo step. Download a copy first if you need to preserve it.
Next: Image adjustments.